News Sites
Article Types
Recorded Demo
News sites have two article types: internal and external. The internal article template is used for in-house stories written by your college/department. The external article allows colleges/departments to link to other internal CMS articles or those produced outside of USF (i.e. other news outlets such as Tampa Bay Times).
Internal Article
Create
- Navigate to the appropriate year folder within your news folder (i.e. 2023).
- Click "+ NEW" at the top righthand corner and select "Internal Article".
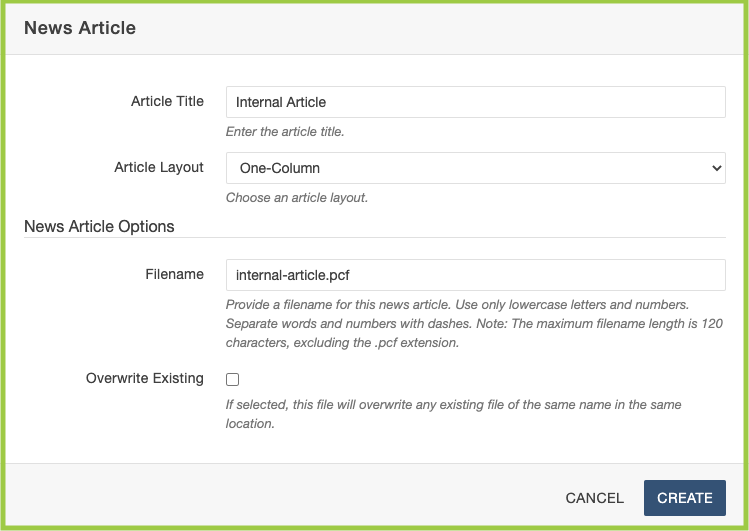
- A news article pop-up will appear (pictured above).
- Enter the Article Title — typically the story's headline.
- Select the Article Layout: One-Column or Two-Column
- One-column will display your widgets at the bottom of the article layout.
- Two-column will display your widgets to the righthand side of the article. This will also determine the type of hero options available.
- Enter the Filename — typically a shortened version of the headline.
- For example, if the headline is "USF is a great university", the filename could be "usf-great-university.pcf".
- Remember to use lowercase letters and numbers only, with words separated by dashes.
- If you are overwriting an existing file (replacing an article with the same filename), check the "Overwrite Existing" box.
- Select "CREATE"
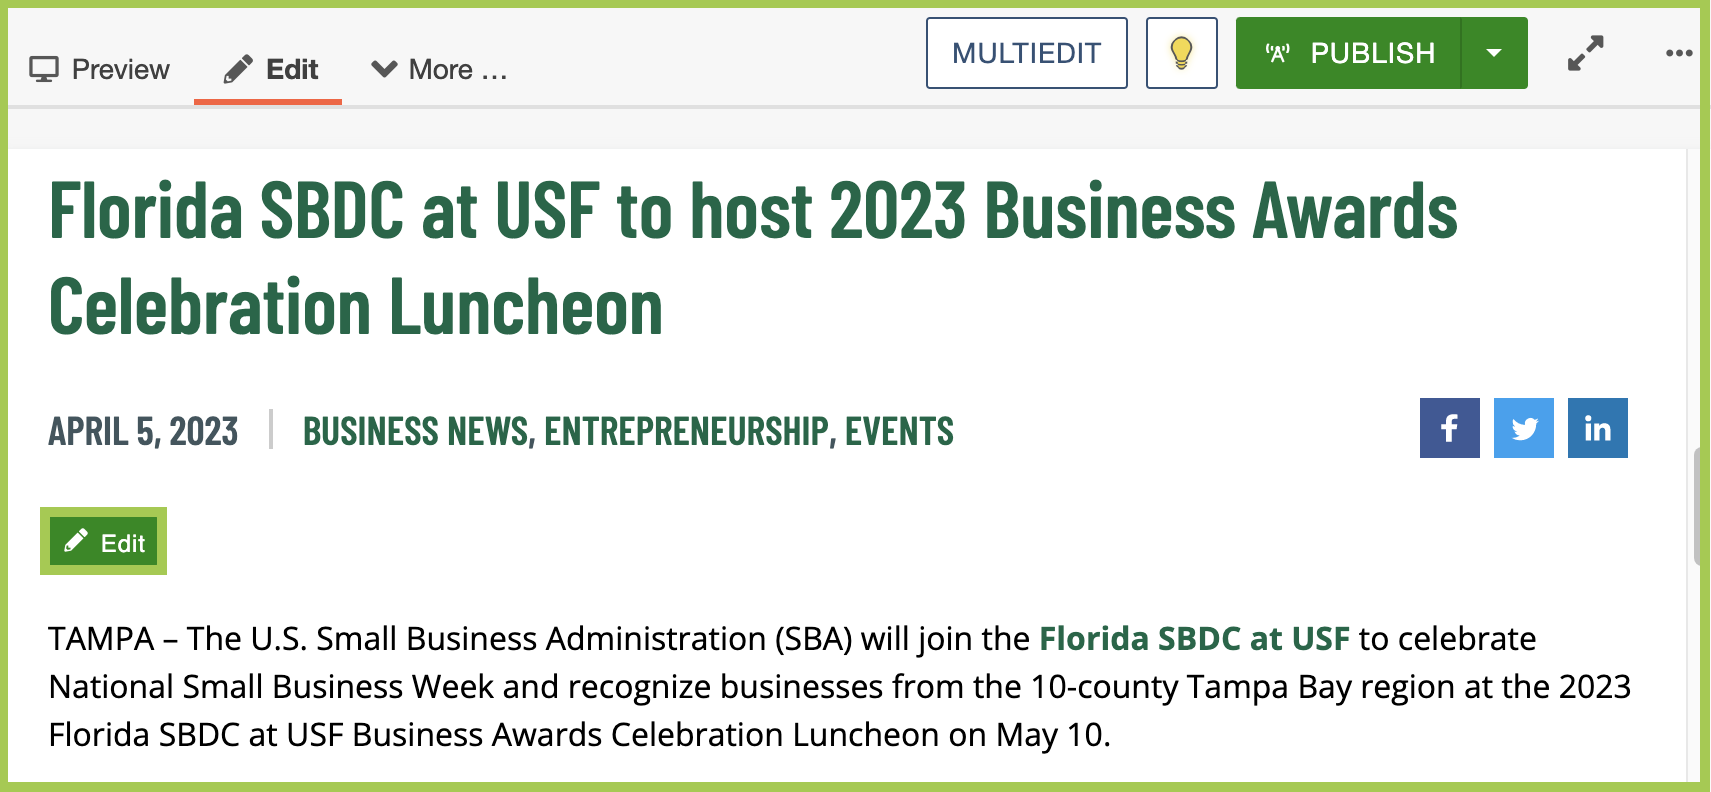
- The next screen will look similar to a text page.
In the MultiEdit section, you can update the internal article's details and look and feel.
- Make sure the article is checked out by clicking the lightbulb icon (it should be yellow). Click "MULTIEDIT" at the top righthand corner.
Article Layout
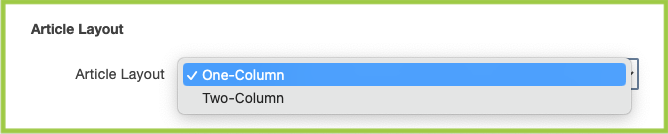
- When initially building an internal article, you selected between a One-Column or Two-Column Article. However, you can change the layout in this section.
Article Details
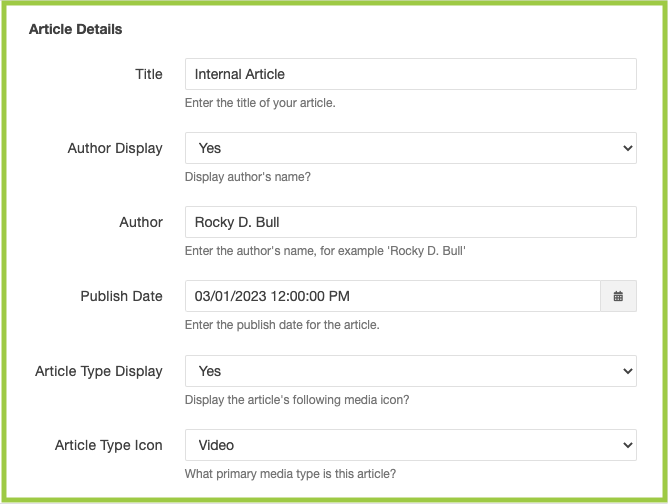
Title
- When initially building an internal article, you created the Title. However, you can change it in this section.
Author Display
- Select whether you would like the author's name to be displayed on the article.
Author
- Enter the author's name in the text field.
Publish Date
- Select the publish date you would like the article to display. Please note: If the Publish Date field is left blank, the article will not appear on the Listing page.
Article Type Display and Article Type Icon
- You can choose to have an icon appear next to your article on the listing page to indicate the type of story: Text, Video, Image, or Audio. Choose "Yes" or "No" in the Article Type Display dropdown and choose the corresponding Article Type Icon (if "Yes" was selected).
Listing Details
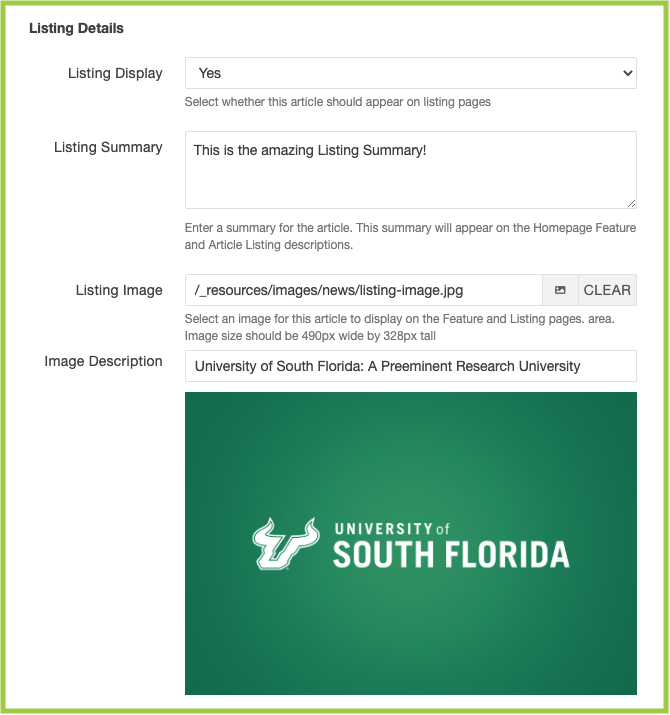
Listing Display
- You can choose to have your internal article appear on the Listing Page of your news site. Choose "Yes" or "No" in the Listing Display dropdown.
Listing Summary
- Create a brief description of the article and enter it in the Listing Summary text field. The Listing Summary will display below the Listing Image on the Listing Page.
Listing Image*
- Select the image you would like displayed with the article on your Listing Page by
clicking the Dependency Manager icon.

- Navigate to the correct folder to locate the image and click "INSERT".
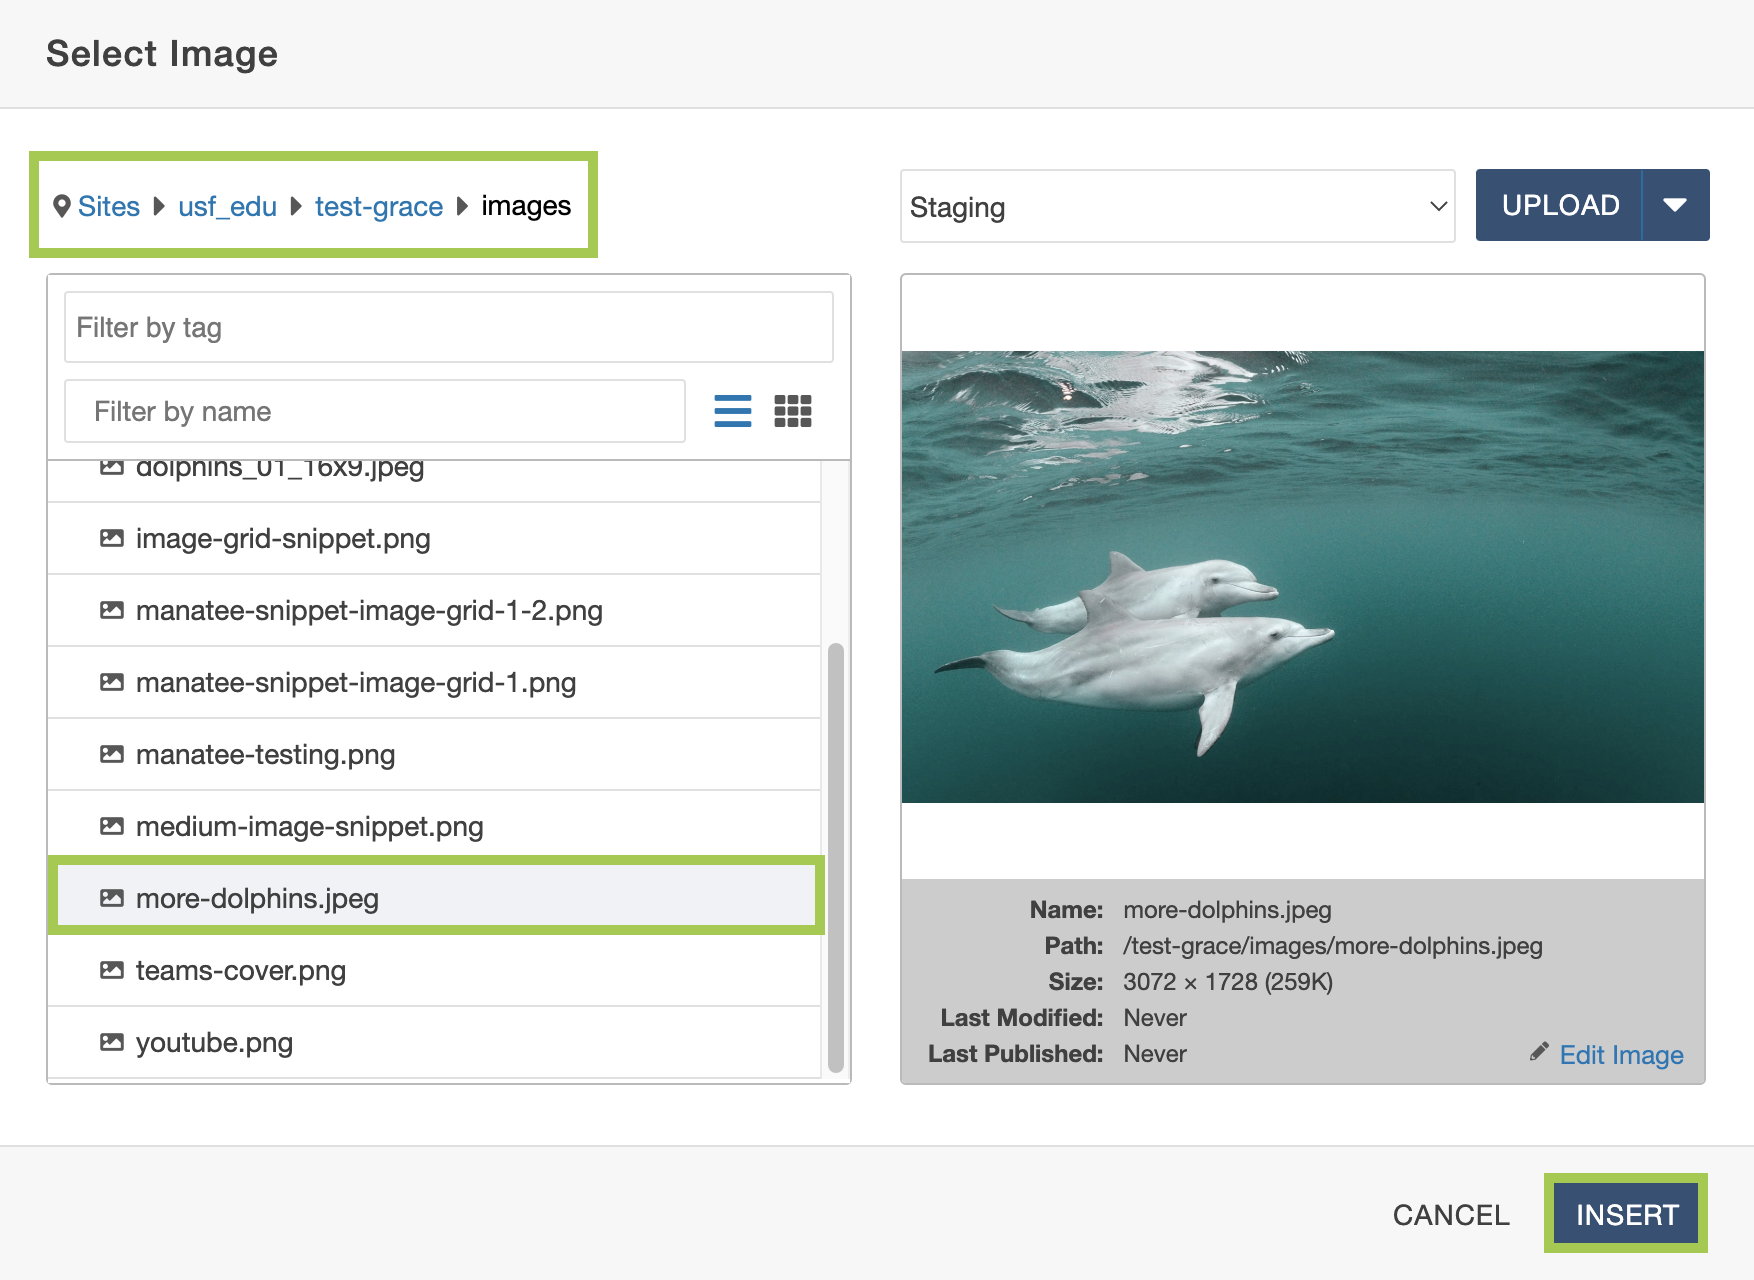
- It will then populate the image's Dependency Tag.

- Create a description for the image and enter it in the Image Description text field. This serves as alternative (alt) text for the image and is important for accessibility.
- Note: A Listing Image must be included on all articles (even if using a Default Listing Page) for all Listing Page elements to function correctly. The default Listing Image will suffice if not you are not using an original image.
*Note: The image will only appear if you have an Enhanced Listing Page.
Hero Image/Video Content
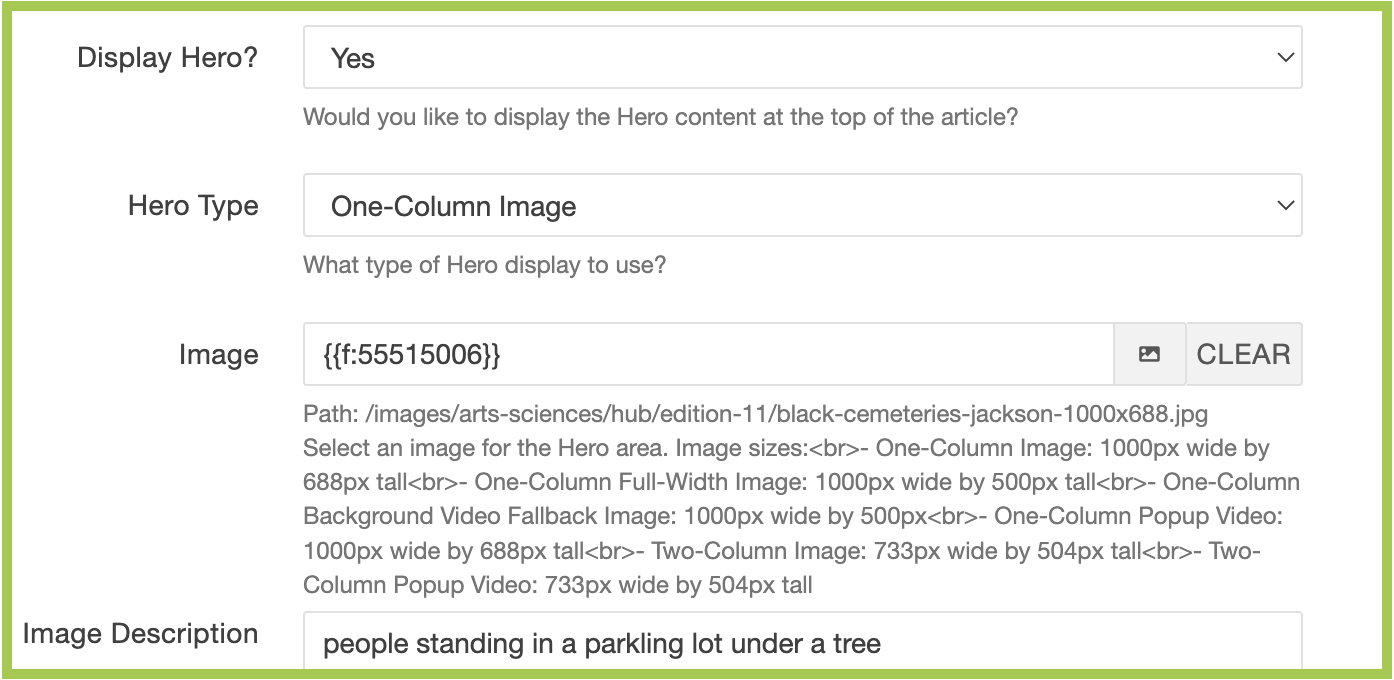
Display Hero?
- You can choose to display a Hero Image or Video at the top of your article. Choose "Yes" or "No" in the Display Hero dropdown.
Hero Type
- Users can choose between the following for Hero Types:
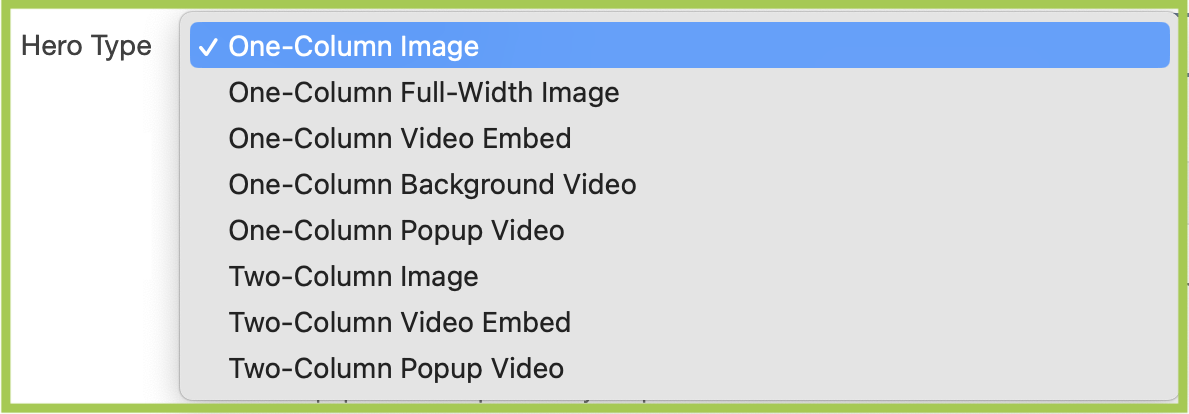
- Select the Hero Type in the dropdown.
Image and Image Description
- If you selected a Hero Type with an Image, follow the Listing Image instructions for more information.
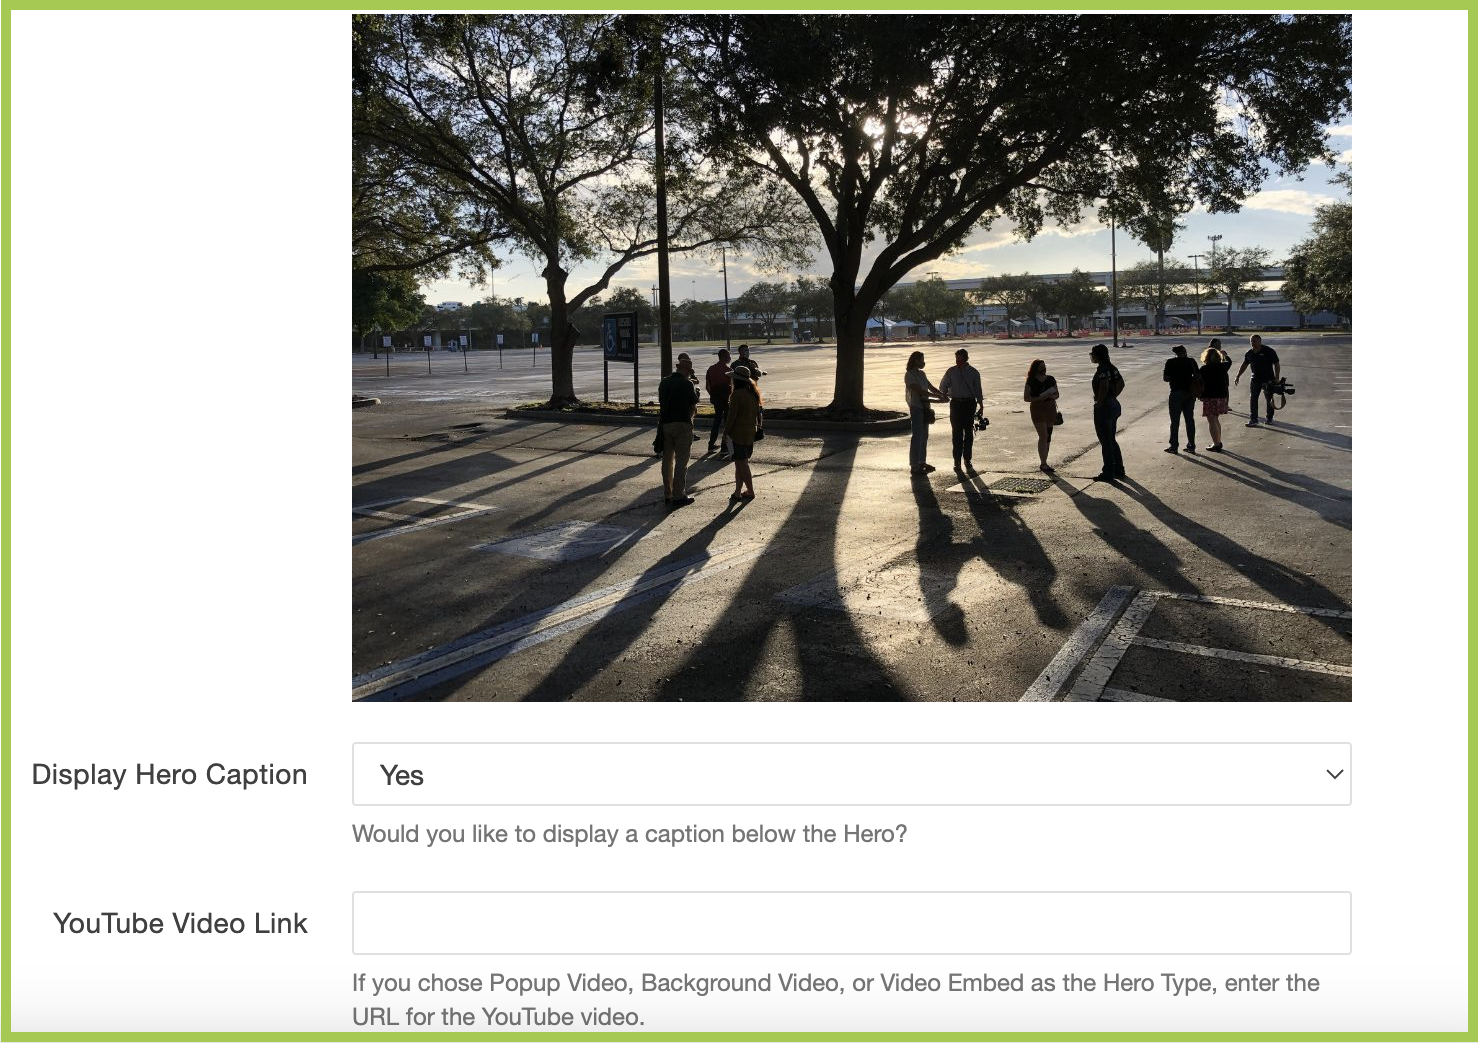
Display Hero Caption
- You can choose to display a Hero Caption to accompany your Hero Image / Video Content. Choose "Yes" or "No" in the Display Hero Caption dropdown.
YouTube Video Link
- If you selected a Hero Type with a Video, paste the entire URL of the video into the
YouTube Link text field.
- Once completed, click "SAVE" in the the top righthand corner.
Parameters
- Navigate to the Parameters section of your article (Properties > Parameters). Parameters
allows you to edit your article's Title, Metadata, and other custom settings.
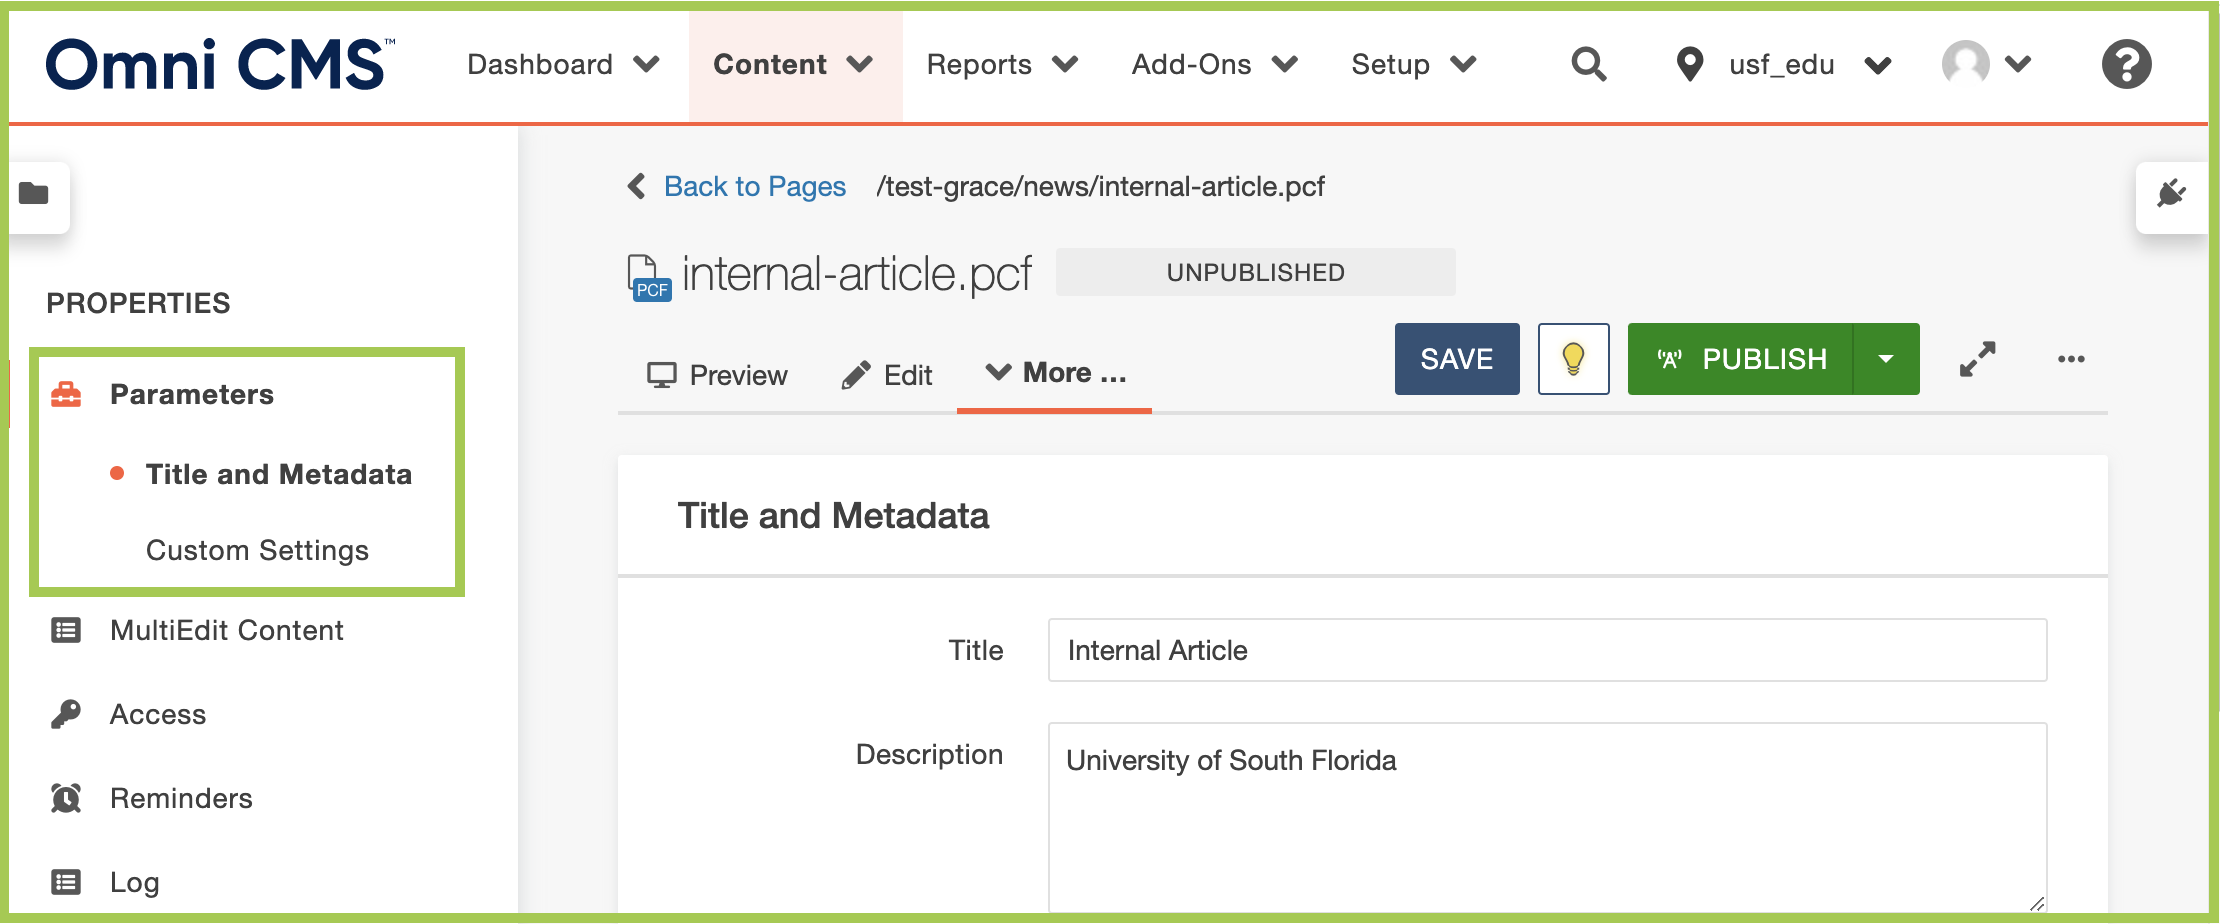
Title and Metadata
Title
- The Title area allows you to update the title of your article.
- Try to keep the title short and concise.
Description
- In the Description area, include a short summary of your story (including important
keywords).
- This is the same description that shows up on Google (or other Search Engine Results Pages) searches.
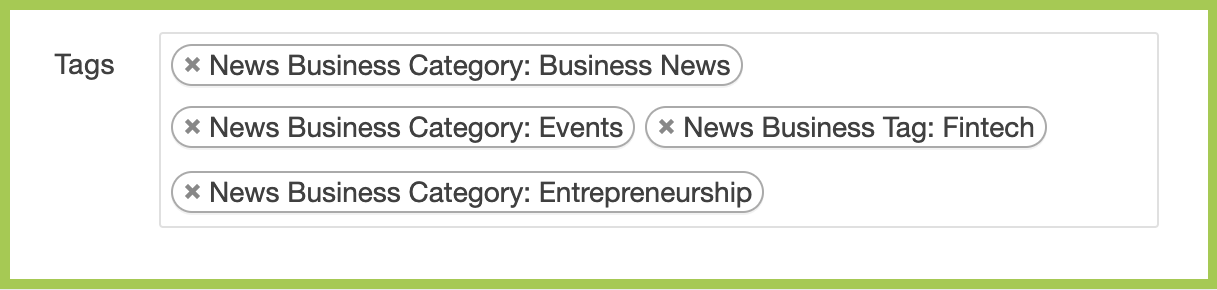
Tags
- The Tags field is where you can enter Tags and Categories.
- Tags and Categories are created with a naming convention unique to your news site.
- For example, "News Business Tag:" and "News Business Category:".
- Please note: Categories are created when setting up your news site. If you need to create a new Category, please submit a CMS Support Intake Form.
- Tags and Categories are created with a naming convention unique to your news site.
- Add the appropriate Category or Tag to the article by typing the name in the Tags field. Please note: If the Tags field is left blank (i.e. no Category has been selected), the article will not appear on the Listing page.
- Learn more about Categories and Tags.
Custom Settings - Social Sharing
Enabling Social Sharing populates three social buttons (Facebook, Twitter, and Linkedin) on your article that allows readers to share the article on their social media channels.
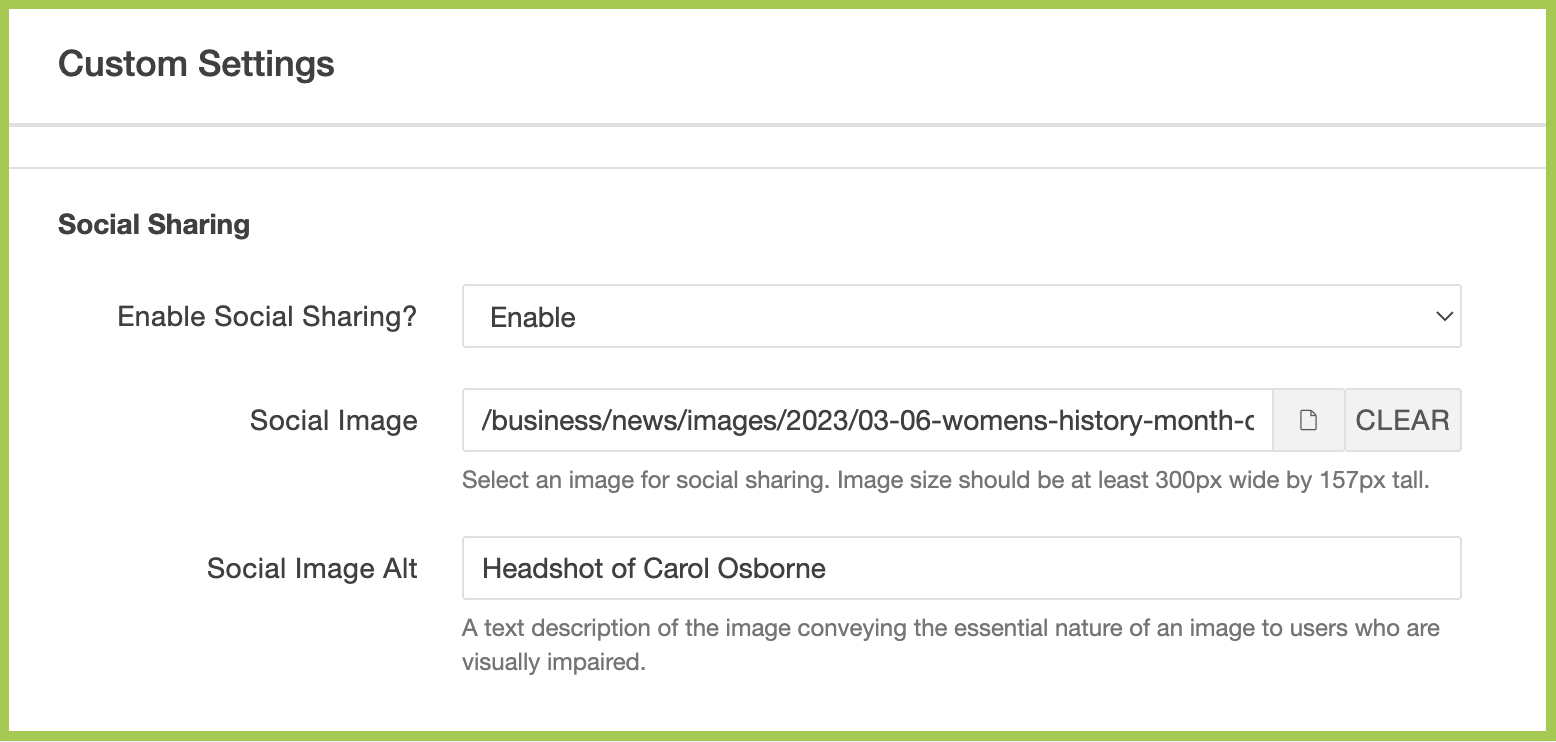
Enable Social Sharing?
- You can choose to Enable or Disable Social Sharing on your article. Choose "Enable" or "Disable" in the 'Enable Social Sharing?' dropdown.
Social Image
- A default image will be shared from the article (if provided). However, you can provide
an alternate photo to be displayed on social media.
- Select the image by clicking the Dependency Manager icon.
- Navigate to the correct folder to locate the image and click "INSERT".
Social Image Alt
- Create a description for the image and enter it in the Image Description text field. This serves as alternative (alt) text for the image and is important for accessibility.
Edit
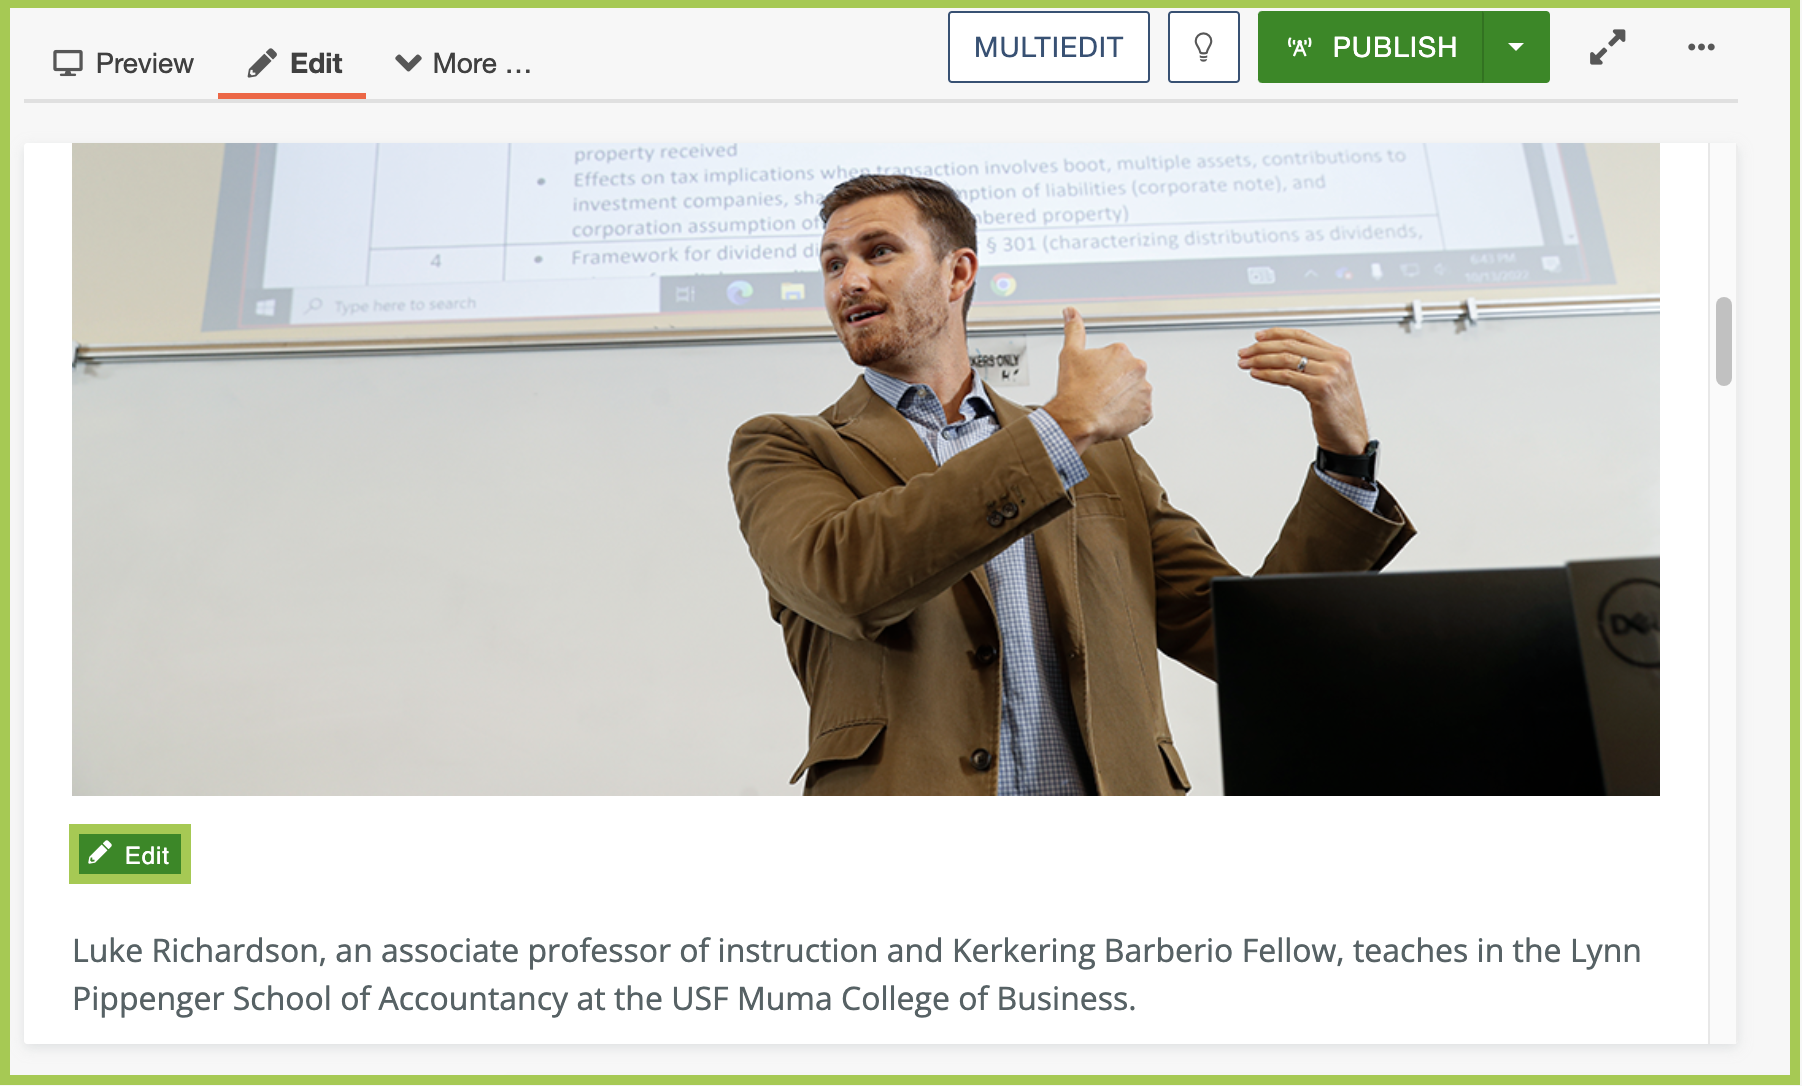
Now that you have set up all backend information for your article, the next step is adding your content.
- Make sure the article is checked out by clicking the lightbulb icon (it should be
yellow).
- If you elected for your Hero Image or Video to have a caption, you will see an additional
Edit button underneath the image or video.
- Click Edit to update the caption using the text-only WYSIWYG Editor.
- Once you are done editing the caption click Save.
- If you elected for your Hero Image or Video to have a caption, you will see an additional
Edit button underneath the image or video.
- Click Edit.
- Edit as you would a Text Page (using the WYSIWYG Editor), but using the News-specific Snippets (if applicable).
- Once you finished editing your article, click Save.
- Publish to Test and/or Production.
External Article
Create
- Navigate to the appropriate year folder within your news folder (i.e. 2023).
- Click "+ NEW" at the top righthand corner and select "External Article".
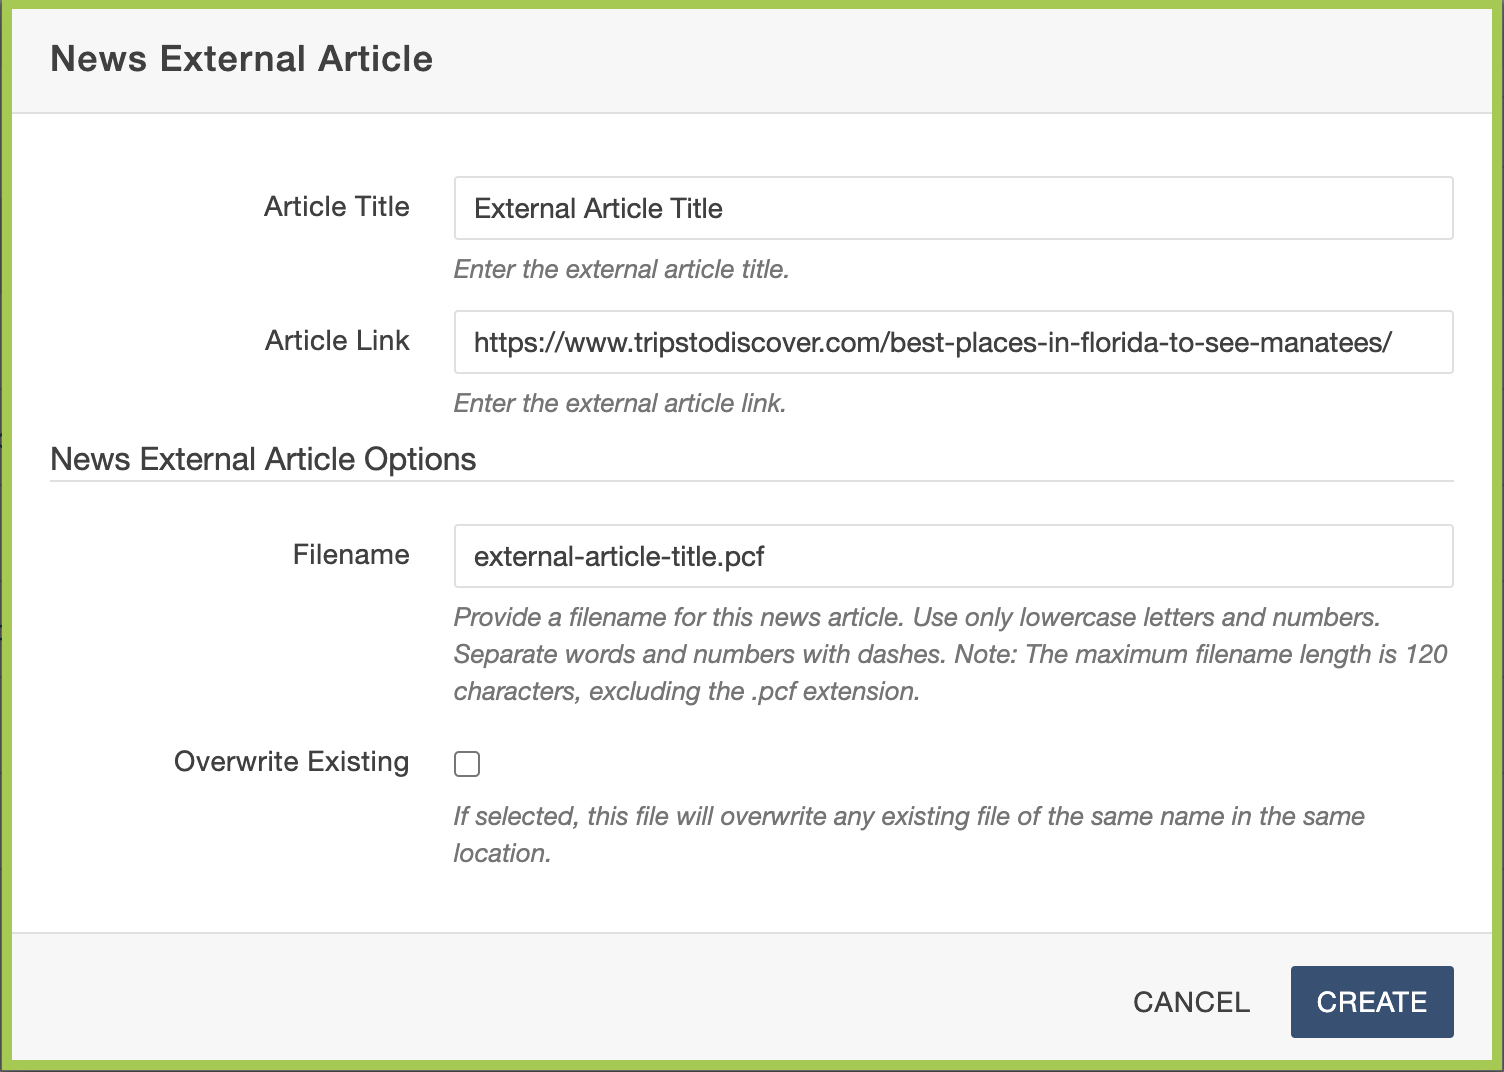
- A news article pop-up will appear (pictured above).
- Enter the Article Title — typically the story's headline.
- Paste the entire article URL in the "Article Link" field.
- Enter the Filename — typically a shortened version of the headline.
- For example, if the headline is "USF is a great university", the filename could be "usf-great-university.pcf".
- Remember to use lowercase letters and numbers only, with words separated by dashes.
- If you are overwriting an existing file (replacing an article with the same filename), check the "Overwrite Existing" box.
- Select "CREATE"
MultiEdit
In the MultiEdit section, you can update the internal article's details and look and feel.
- Make sure the article is checked out by clicking the lightbulb icon (it should be yellow). Click "MULTIEDIT" at the top righthand corner.
Article Details
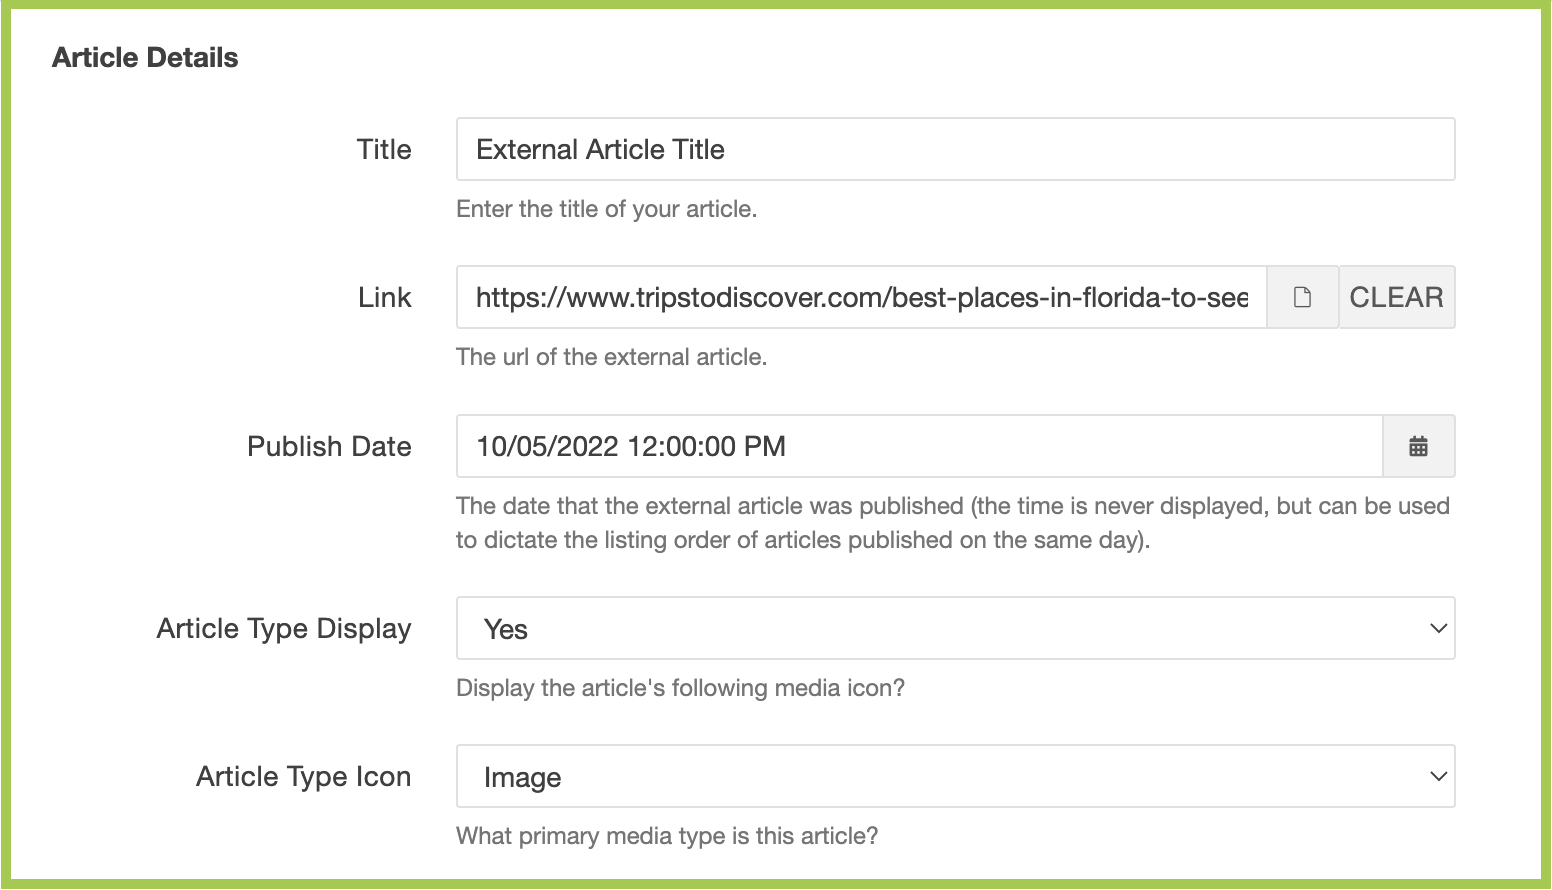
Title
- When initially building an internal article, you created the Title. However, you can change it in this section.
Author Display
- Select whether you would like the author's name to be displayed on the article.
Author
- Enter the author's name in the text field.
Publish Date
- Select the publish date you would like the article to display. Please note: If the Publish Date field is left blank, the article will not appear on the Listing page.
Article Type Display and Article Type Icon
- You can choose to have an icon appear next to your article on the listing page to indicate the type of story: Text, Video, Image, or Audio. Choose "Yes" or "No" in the Article Type Display dropdown and choose the corresponding Article Type Icon (if "Yes" was selected).
Listing Details
Listing Display
- You can choose to have your internal article appear on the Listing Page of your news site. Choose "Yes" or "No" in the Listing Display dropdown.
Listing Summary
- Create a brief description of the article and enter it in the Listing Summary text field. The Listing Summary will display below the Listing Image on the Listing Page.
Listing Image*
- Select the image you would like displayed with the article on your Listing Page by
clicking the Dependency Manager icon.
- Navigate to the correct folder to locate the image and click "INSERT".
- It will then populate the image's Dependency Tag.
- Create a description for the image and enter it in the Image Description text field. This serves as alternative (alt) text for the image and is important for accessibility.
*Note: The image will only appear if you have an Enhanced Listing Page.
Parameters
- Navigate to the Parameters section of your article (Properties > Parameters). Parameters
allows you to edit your article's Title, Metadata, and other custom settings.

Title and Metadata
Title
- The Title area allows you to update the title of your article.
- Try to keep the title short and concise.
Description
- In the Description area, include a short summary of your story (including important
keywords).
- This is the same description that shows up on Google (or other Search Engine Results Pages) searches.
Tags
- The Tags field is where you can enter Tags and Categories.
- Tags and Categories are created with a naming convention unique to your news site.
- For example, "News Business Tag:" and "News Business Category:".
- Please note: Categories are created when setting up your news site. If you need to create a new Category, please submit a CMS Support Intake Form.
- Tags and Categories are created with a naming convention unique to your news site.
- Add the appropriate Category or Tag to the article by typing the name in the Tags field. Please note: If the Tags field is left blank (i.e. no Category has been selected), the article will not appear on the Listing page.
- Learn more about Categories and Tags.
- Click Save.
- Publish to Test and/or Production.
- There is no Edit section for an external news article. Once you have completed all MultiEdit items, the article is finished.