Marketing
Outlook Email Signatures for USF Employees
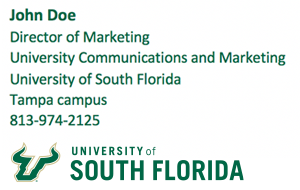
An easy way for our community to show a uniform brand is to have a consistent format for faculty and staff email signatures. To accomplish this, we recommend the following configuration in Microsoft Outlook with name, title, unit/department, university name, your primary campus, phone number, and logo.


Everyone's email settings are different and it will require that you manually create your own signature. The above image is a visual example of one possible layout and the length of your signature will depend upon what information is most important for you to display. Please use your best judgement and remember that people also view emails on mobile devices.
SPECS
- All text should be Calibri.
- All text should use USF Green (RGB: 0, 103, 71 or Hex #006747).
- Name should be bold and 14pt
- Contact information should be 12pt.
The following items can be used in your signature:
- Name (required)
- Title (required)
- Unit/Department (required)
- University of South Florida (required)
- Your primary campus or mailing address (required)
- Phone number (required)
- Cell phone number
- Fax number
- Website
- Email address
- Pronouns
- USF Logo (alt text is required. See instructions below)
- Social media (links only, no icons). Example: "Follow us: Facebook | Twitter | Instagram").
- Sunshine Law statement (in italics). Example: "Due to Florida’s broad public records law, email to or from university employees may be considered a public record and made available to the public and the media upon request."
Email Signature Logo Downloads
If you would like to use a logo, please download one below. These are the only logos that are currently approved to be used in email signatures. Please keep the signature block on a line by itself and place it after all of your contact information.
NOTE: Rarely, the signature block may display at a different size than shown. If this occurs, you may manually resize so that it looks similar to the provided example at the top of this page. To test your new email signature, we encourage you to send an email to usfbrand@usf.edu for review.
To save: right click on the image. For Outlook Web (Office 365): right click on the image to copy it.
Please note: Not all email clients display images. Remember to always keep "University of South Florida" somewhere in the text of your signature in case the logo does not appear.
Instructions
Using the instructions below, create your signatures based on the approved specs.
Outlook for Mac
To set a signature, follow these steps:
- If you would like to add a logo to your signature, save the USF logo file that is provided above somewhere on your computer. If not, skip this step.
- With Outlook open, go to the Outlook menu, then select Preferences.
- Under Email, select Signatures.
- Double-click Untitled and then type a name for the signature you created. Or click the plus (+) icon, to add a new signature.
- In the Signature editor, type the text that you want to include and format it using the specs listed above.
- If you would like to add the logo, on a new line, click on the Pictures icon. Then select Picture from file.
- Locate the USF logo file on your computer and click Insert.
- Once inserted, right click on the logo and click Edit Alt Text. For accessibility compliance, it is REQUIRED that alt text be added to image files. Note: If the alt text option does not appear for you, then include the text that is in the image file (ex., "University of South Florida.") in the contact information block of your email signature.
- Enter the alt text. The alt text should be the text the is included in the image file. (ex., "University of South Florida"). If the image is a link, the alt text should describe the link's destination.
- Click Ok.
- Save your signature.
To have the new signature automatically appear on all new messages and/or replies/forwards, you can select those preferences under "Choose default signature" on the main signature window.
Outlook for PC
- If you would like to add a logo to your signature, save the USF logo file that is provided above somewhere on your computer. If not, skip this step.
- With Outlook open, go to the File menu. Then Options, then Mail.
- Click on the Signatures button next to where it says, "Create or modify signatures for messages".
- Click New.
- Enter the name you want this signature to have.
- Click OK.
- Enter all of your desired text and format it using the specs listed above.
- If you would like to add the logo, on a new line, click on the Image icon (it's to the right of "Business Card").
- Locate the USF logo file on your computer and click Insert.
- Once inserted, right click on the logo and click Picture.
- Click the Alt Text tab. For accessibility compliance, it is REQUIRED that alt text be added to image files. Note: If the alt text option does not appear for you, then include the text that is in the image file (ex., "University of South Florida.") in the contact information block of your email signature.
- Enter the alt text. The alt text should be the text the is included in the image file. (ex., "University of South Florida"). If the image is a link, the alt text should describe the link's destination.
- Click Ok.
Outlook Web (Office 365)
IMPORTANT: For accessibility compliance, it is required that alt text be added to image files. Outlook Web (Office 365), however, does not support this feature in email signatures. Therefore, if you still want to use a USF logo, it is then REQUIRED that you include the text that is in the image file (ex., "University of South Florida. #OneUSF") in the contact information block of your email signature. If the image is a link, the alt text should describe the link's destination.
To set a signature, follow these steps:
- If you would like to add a logo to your signature, save the USF logo file that is provided above somewhere on your computer. If not, skip this step.
- Sign in to Outlook on the web.
- Click on the gear icon for settings. Then View all Outlook settings, then Compose and reply.
- Under Email signature, type the text that you want to include and format it using the specs listed above (Outlook Web does not allow custom font colors. In this case, please use "dark gray", "darker gray", or "black" for your text).
- If you would like to add the logo, open the USF logo file on your computer. Copy the logo image.
- On a new, separate line from the text of your signature, paste the logo image that you just copied.
- If you want your signature to appear at the bottom of all new email messages that you compose, select the Automatically include my signature on new messages I compose check box.
- If you want your signature to appear on messages that you forward or reply to, select the Automatically include my signature on messages I forward or reply to check box.
- Click Save and then close out of the window.
If you've created a signature, but didn't choose to automatically add it to all outgoing messages, you can add it later when you write an email message. At the bottom of the compose pane, click the "..." icon for more actions. Then select Insert signature.
Related link: Outlook Web (Office 365) support site
If you have any questions about email signatures, please contact the UCM Marketing Team.